Thursday, September 16, 2010

Thanks So Much Card Pocket

Yesterday I shared my favorite card from the 2010 Convention Make & Take projects, the Thank You Watercolor Card. Today I will be sharing what's called a Card Pocket. It's a really cute idea that I intend to use again in the future, so keep your eye out! :) 

This project used the same Small Open-End envelope as the Watercolor Card yesterday. We just altered it a bit to be able to put 3x3 cards and Mini Square envelopes in either side of it.

Step 1: Seal the end of the envelope.
Step 2: Trim off a small strip off one of the long sides of the envelope.
Step 3: Open up the long side of the envelope that you just cut. Punch 2 half circles on the inside flap of the envelope. (1-1/4" Circle punch)
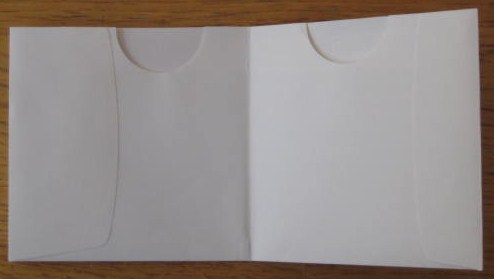
Step 4: Fold card in half.
And then you have your Card Pocket!

It should look like this when you are finished:
We used a 3x3 square of Real Red from the Brights Patterns Designer Series Paper to make a layer on the front of the envelope. We used Daffodil Delight, Early Espresso, Marina Mist and Real Red Stampin' Write markers to color on the stamp and stamped it onto a piece of 2" x 2" Whisper White card stock and popped that up off of the DSP using dimensionals. Ran a piece of Daffodil Delight 1/4" grosgrain ribbon under the Whisper White layer and tied a bow on the side.

The front of the Card Pocket now looks like this:

We then stamped 3 more of the So Many Thanks stamp onto 3 more 2"x2" pieces of Whisper White card stock and placed them onto a 3"x3" piece of colored card stock.

The Marina Mist card looks like this:


We put the other two onto a piece of Real Red card stock and a piece of Daffodil Delight card stock.

The set of them looks like this when finished:


And your finished product will look like this:


Then you open up the envelope and put 3 Mini Square Whisper White envelopes in one side and the 3"x3" cards in the other side and you have a cute little set of Thanks So Much cards.

Here's a real quick rundown of what products were used in this project:

Stamps: So Many Thanks single stamp
Card Stock & Paper: Daffodil Delight, Marina Mist, Real Red and Whisper White card stock. Brights Patterns Designer Series Paper in Real Red.
Ink: Daffodil Delight, Marina Mist, Real Red and Early Espresso Stampin' Write markers
Accessories & Tools: Mini Square Whisper White envelopes, Small Open-End Whisper White envelopes, Daffodil Delight 1/4" Grosgrain Ribbon, 1-1/4" Circle punch and Stampin' Dimensionals

Thank you for looking again today, and if you have any questions please feel free to ask in the comments below or send me an email at MelJBuss@gmail.com.

I'll be posting yet another favorite Make & Take card tomorrow, but until then, happy stamping!

Melissa Buss

Wednesday, September 15, 2010

Just Believe

One of the most exciting parts about a Stampin' Up! Convention is the Make & Take projects that you get to do while you are there! I was one of the volunteer helpers this past July and had a wonderful time helping ladies of all different skill sets finish all of their beautiful projects.

Over the next couple of days I am planning on showing you a couple of my favorite Make & Take projects from the 2010 Stampin' Up! Convention.

Today I am going to be showing you the Thank You Watercolor Card.


Used a stamp from the new Just Believe stamp set on page 109 in Not Quite Navy on the bottom right hand corner of the envelope.

We used the Bashful Blue, Not Quite Navy, Pear Pizzazz and Old Olive Stampin' Write markers on the same image and misted the stamp with water out of a small spray bottle. 

I tore the watercolor paper after I stamped the watercolor image onto it and adhered it to the Bashful Blue card stock and then tore it in the same manner as the Watercolor Paper.

The button has a string of linen thread through the front and tied in a knot and applied to the card using a Mini Glue Dot.

It is a very simple and elegant card to make and you could always swap out the saying for another.

Stamps: Just Believe set

Card Stock and Paper: Bashful Blue card stock, Not Quite Navy card stock, and Watercolor Paper

Ink: Bashful Blue Stampin' Write marker, Not Quite Navy Stampin' Write marker, Pear Pizzazz Stampin' Write marker, Old Olive Stampin' Write marker

Accessories & Tools: Small Open-End Whisper White Envelopes, Certainly Celery 5/8" Satin Ribbon, Linen Thread, Brights Designer Buttons, Mini Glue Dots, Spray bottle & water

Thanks for looking, and I hope you'll come back tomorrow to see my next favorite card using the new So Many Thanks single stamp from the 2010 Idea Book & Catalog.

-Melissa Buss


Friday, September 10, 2010

New Product: Letterpress Plates!

We have a new product featured in our Holiday Mini Catalog! Letterpress Plates - they add a whole new dimension to your stamping projects!  You can use these plates with the Big Shot machine to add an ink debossed impression to cards, invitations, accents for scrapbook pages, home décor, and more.  Reminiscent of an old-world letterpressLetterpress Plates provide sophistication, dimension, and color all in one!  

Trick or Treat Letterpress Plate (#120980, $7.95) - Our Trick or Treat plate gives you a nice bold and taunting option for a banner or greeting that coordinates with our 1800s London Halloween suite of products.
Joyful Season Letterpress Plate (#120981, $5.95) - The playful socks on our Joyful Season plate will surely get your friends and family in a jolly mood for the festivities and traditions of Christmas.  Coordinates with Candy Cane Christmas Suite.  8” x 3” x ¼”.

Northern Trim Letterpress Plate (#120982, $5.95) - Our Northern Trim plate coordinates with our Northern Hearts stamp set and Northern Flurry Textured Impressions Embossing Folder for a trio of delightful images, texture, and trim for all your captivating wintry projects.  8” x 3” x ¼”. 

Lots of Love Letterpress Plate (#120983, $7.98) -  Our Lots of Love plate is appropriately packed with love and affection. When debossed with bold Real Red Craft ink, the recipient will have no doubt as to the depth of your love for them. Coordinates with Filled with Love set.  8” x 5-7/8” x ¼”.


Check out this great Stampin' Up! video on how to use our Letterpress Plates:


LETTERPRESS TIPS:
  • Pigment ink, such as Craft Stampin’ Ink, works best for letterpress projects. Classic (dye-based) Stampin’ Ink does not lay down evenly on the plate or transfer evenly to paper.
  • Do not apply too much ink, or your image will not look crisp.
  • You can use a Stampin’ Spot™, Stampin’ Pad™, or brayer to apply the ink.
  • If you want to apply different colors of ink to one plate, it’s easier to use a Stampin’ Spot. Simply dab the Stampin’ Spot on the plate.
  • If you want to apply one color of ink to the entire plate, you can also use our un-inked Craft Stampin’ Pad, filled with the Craft Stampin’ Ink refill color of your choice, applying the ink from the pad directly to your Letterpress Plate.
  • If you want to apply one color of ink to the entire plate, it might be easier to use a brayer to apply the ink evenly. A brayer is also helpful if you want to create multiple projects because it allows you to re-ink the plate quickly. Simply ink our un-inked Craft Pad with Craft Stampin’ Ink, ink the brayer thoroughly using the Craft Stampin’ Pad, and roll the brayer across your Letterpress Plate.
  • Because the Letterpress Plates emboss so deeply into your paper, they may press into extremely small recessed areas, such as scratches in cutting pads. For best results, we recommend that you use a cutting pad that is relatively new and unscratched.
  • Letterpress Plates work well on card stock and other paper. Porous paper (such as watercolor paper) or paper with weakened fibers (such as textured card stock) will create a deeper impression.
  • Make sure you test your materials before creating your projects to ensure you get the results you want.
If you want to order any of these Letterpress Plates please contact me at MelJBuss@gmail.com or visit my website at MelissaJoBuss.stampinup.net !